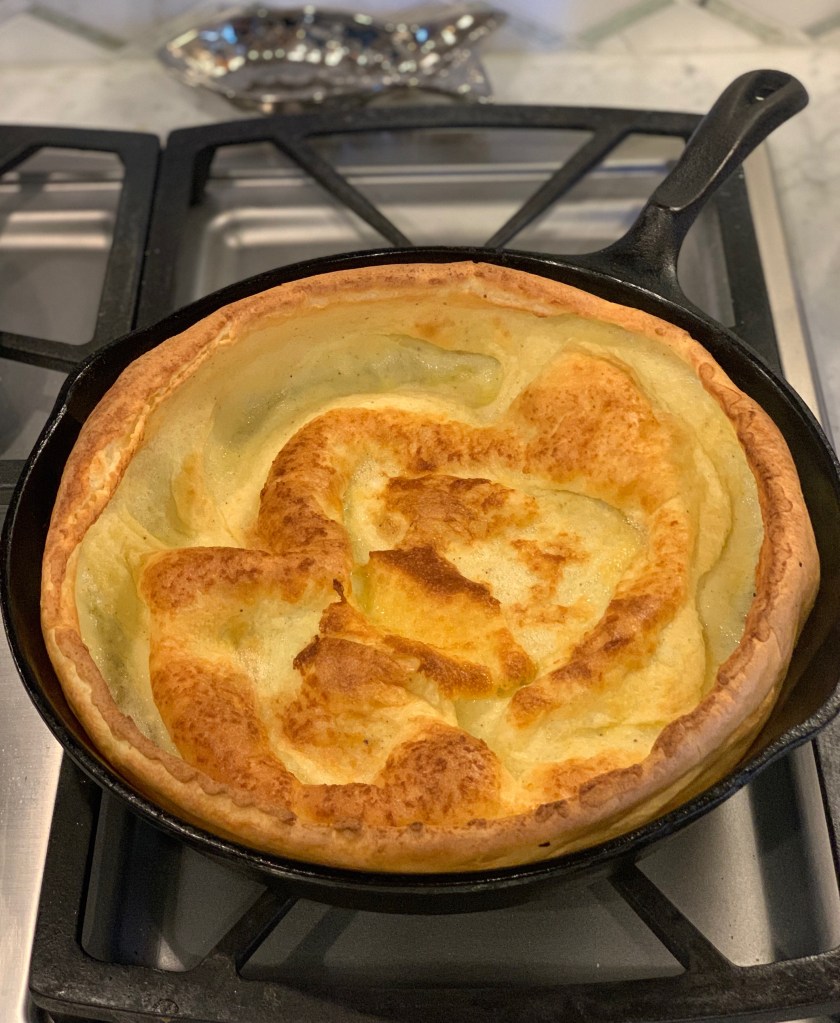
Holiday Cookies

šŸŽ¶ Itā€™s the most wonderful time of the year…šŸŽ¶ Cookie time!! We can bake sweets galore and not feel guilty about it. Give them as gifts, nibble a few while you address cards, or just enjoy that wonderful feeling you have thinking about how blessed we truly are, despite the challenges we face.

Photo credit: Ā© Debra M. Kirsch 2020

These charming cookies are just the thing to spread some holiday cheer. This time I used a recipe from Willams-Sonoma that came with a cookie cutter set, sometime in the past.

They are a bit thicker than I typically make them, but I will admit they are sturdier and held their shape well while baking. *TIP! I learned that if you roll the dough out directly on a silpat sheet (no flour needed), and cut the cookies there, you can just remove the excess and pop the silpat on a baking sheet) and into the oven. This makes for less handling of the cookies, but the best part is that you can easily re-roll the scraps to cut more cookies, and not have all the extra flour from rolling!!

Photo credit: Ā© Debra M. Kirsch 2020

Hereā€™s the recipe, it was super easy!

Ingredients:

  • 2 1/4 cups all purpose glour
  • 1/4 tsp baking oowder
  • 1/4 tsp salt
  • 12 T (1 1/2 sticks) unsalted butter, at room temp, cut into pieces
  • 3/4 cup sugar
  • 1tsp vanilla extract
  • 1egg
  • Royal icing (recipe below)
  • Sprinkles, sugars, candy decorations
  1. In a bowl, sift together flour, baking powder, and salt. Set aside.
  2. In the bowl of an electric mixer, beat the butter and sugar on medium speed until light and fluffy, about 3-5 minutes. Beat in egg and vanilla. Reduce the speed to low and add the flour mixture in three additions, scraping down the sides of the bowl in between. Mix until just combined.
  3. Form dough into a ball and refrigerate for at least 3 hours, or as long as overnight.
  4. Preheat oven to 350 degrees F. Line baking sheets with parchment paper or use Silpat nonstick liners.
  5. On a slightly floured surface (or directly on Silpat), cut out cookie shapes. Space cookies about an inch apart and bake until just golden around the edges, about +/- 10-12 minutes. Cool on Pan for 5 minutes and remove to cooling rack. Decorate as desired. Makes about 12-18 cookies (more if you roll them on the Silpat!).
Photo credit: Ā© Debra M. Kirsch 2020

Royal Icing

  • 2 1/4 cups confectionersā€™ sugar, sifted
  • 2 egg whites (or equivalent meringue powder & water)
  • 1/4 tsp vanilla, or other flavored extract, I used peppermint
  • 1/4 tsp cream of tarter

With an electric mixer, beat egg whites until they get foamy, add sugar, vanilla, and cream of tarter. Beat on high speed until the mixture is glossy and stiff peaks form, about 5 minutes. Use immediately, or store covered tightly with plastic wrap at room temp for up to 6 hours. (It will last longer if you used meringue powder instead of egg whites). Divide into several bowls and tint with food coloring. Have fun!

Photo credit: Ā© Debra M. Kirsch 2020

This is a fun project, that can be done in one day, or spread over a couple. Beware, there are always sprinkles and icing in the strangest places afterwardsšŸ˜‚

Happy holidays!!

Photo credit: Ā© Debra M. Kirsch 2020

Thai Red Curry Soup

Photo credit: Ā© Debra M. Kirsch 2020

My daughter sent me this recipe, she tried it first and was so happy with it, and the cold fall nights were the perfect time to try it.

I admit, I had to do a little shopping because there were a few things that I donā€™t regularly keep on hand, but it was worth a run to the store! It think it took about 30 minutes start to finish, to pull together, so that adds up to a great weeknight meal as well.

Ingredients:

  • 18 oz boneless skinless chicken breast
  • Salt & pepper
  • 2 T vegetable oil
  • 2 shallots, minced
  • 4 cups chicken broth
  • 1 can coconut milk
  • 2 T fish sauce
  • 2 t sugar
  • 6 oz cremini mushrooms (can sub white mushrooms) trimmed and thinly sliced
  • 6 oz snow peas, strings removed and cut in half
  • 2 t Thai Red Curry Paste
  • 2 T lime juice
  • 1/4-1/2 cup minced fresh cilantro

Directions:

  1. Pat chicken dry, season with salty& pepper. Heat oil in large sauce pan until just smoking. Brown chicken lightly, 2-3 minutes per side and transfer to a plate and cover.
  2. Ad shallot to pan and cook until softened, about 3 minutes. Stir in broth, coconut milk, 2 teaspoons of fish sauce, and sugar. Scrape up any browned bits.
  3. Add browned chicken and any juices that have accumulated, bring to a simmer about 10 minutes. Flip chicken halfway through. Remove chicken to a cutting board, cool slightly and shred.
  4. Return soup to a simmer, stir in mushrooms & snow peas, cooking until tender, about three minutes. Whisk lime juice, curry paste and remaining fish sauce together in a small bowl. Remove soup from heat and stir in lime/curry mixture and shredded chicken. Let sit for about 2 minutes while chicken heats through. Taste for seasoning, add salt/pepper as needed.
  5. Garnish individual portions with a healthy sprinkle of fresh cilantro and enjoy!

Little Potato Bites Appetizer

Photo credit: Ā© Debra M. Kirsch 2020

These little one bite appetizers were a big hit as an appetizer served with champagne, so start off the evening!

I saw something along these lines, I canā€™t remember where, but it was easy enough to remember, or at least inspire.

You will need:

  • about a dozen really small potatoes, I used Baby Dutch Yellow Potatoes
  • 3 slices of bacon, cooked and crumbled
  • egg salad (see below)

Take about a dozen baby potatoes, boiled in salt water until tender, and left to cool. Then pop them in the fridge to firm up and make them easy to slice in half.

Meanwhile, make some egg salad:

  • 3 hard boiled eggs
  • 1 stalk of celery, finely diced
  • 3-4 tablespoons mayonnaise
  • 1-2 tablespoons sour cream
  • 1/2-1 teaspoon Dijon mustard
  • Salt & pepper, to taste

I made my egg salad in a mini processor, and it yielded a wonderful and smooth purƩe, with just enough texture. The celery needs to be really small or it clogs the piping tip.

Take potato half and remove a small divot with a melon baller, this will give a nice spot to pipe your egg salad, place a healthy dollop and top with crumbled bacon or a little caviar.

These are quick easy and delicious! Your guests will think you are a star!!

White Chocolate ā€œBrownieā€ Bites

Photo credit: Ā©Debra M. Kirsch 2020

With an excess of white chocolate in the cupboard, I decided these would make some yummy Halloween treats. In fact, they make make another appearance at Christmas.

The recipe, from SallysBakingAddition.com, is quite similar to Bakers One Bowl Brownies, and you can make it on one bowl. I baked the batter in a jelly roll pan lined with foil instead of a 13 x 9 pan, for half the usual time. This yielded a thinner brownie that was easily cut with small cookie cutters. The cut shapes were covered in a chocolate ganache, and/or melted white chocolate drizzle, in lieu of white chips in the batter, and I also skipped the frosting that went with the original. I used cookie cutters that were just one or two bites in size, so these are wonderful little nibbles to have around when you want a little something sweet, or to share them with friends. This must have yielded 60-70 little bites.

Ingredients:

  • 1 cup (230g; 2 sticks) unsalted butter
  • 6 ounces(170g) pure white chocolate, coarsely chopped*
  • 1 and 1/2 cups (300g) granulated sugar
  • 4 large eggs, at room temperature
  • 2 teaspoons pure vanilla extract
  • 1 and 1/2 cups (188g) all-purpose flour (spoon & leveled)
  • 1/2 teaspoon salt
  • optional: 1 cup (180g) white chocolate chips

Directions:

  1. Preheat the oven to 350Ā°F (177Ā°C) and grease a 9Ɨ13 inch pan or line jelly roll pan with aluminum foil or parchment paper, leaving an overhang on the sides to lift the finished brownies out (makes cutting easier!). Set aside.
  2. In a microwave-safe bowl, combine the butter and chopped white chocolate. Melt in 30 second increments, whisking after each, until completely smooth. Whisk in the sugar until completely combined, then whisk in the eggs and vanilla. Whisk in the flour and salt, then fold in the white chocolate chips (optional) until combined. Batter will be thick. Spread evenly into prepared pan.
  3. Bake for 30 minutes, 15 minutes for jelly roll pan, covering loosely with aluminum foil halfway through. Test the brownies with a toothpick at the 30 minute mark. Insert it into the center of the pan. If it comes out with wet batter, the brownies are not done. If there are only a few moist crumbs, the brownies are done. Keep checking every 2 minutes until you have moist crumbs. My brownies take 32 minutes.
  4. Remove from the oven and place on a wire rack to cool completely before frosting. If cutting into shapes, place in refrigerator for an hour, or more, so brownies are firm. Drizzle cut shapes with chocolate ganache (see recipe below) or melted white chocolate. Add sprinkles if desired.
Photo credit: Ā©Debra M. Kirsch 2020

Chocolate Ganache:

Ingredients:

Directions:

  • Combine melted margarine or oil, cocoa, and hot water.
  • Blend in confectioners’ sugar and vanilla.
  • Pour or spread on brownies or cake.
  • Glaze will firm and almost harden when cool.

I recommend using Coconut Oil, in lieu of Margarine or other oils, since it solidifies at a higher temperature (about 70Ā° F). This will give a better chance of not getting runny at room temperature. Though the recipe says it will harden, itā€™s not like the Magic Shell you pour on ice cream, it is softer than that.

Photo credit: Ā©Debra M. Kirsch 2020

One-Pot Spicy Sausage and Tomato Pasta

Photo credit: Ā© Debra M. Kirsch 2020

Delicious recipe from Chicago Tribune Health & Family section, which turns out to be a recipe from @kitchn, which I really love. The thing that grabbed me about this was the fennel. Itā€™s an ingredient I donā€™t use much, so I put this on my shopping list. This packs a wonderful, cumulative punch of heat, I highly suggest giving it a try. Plus, itā€™s ready in 30 minutes!

https://www.thekitchn.com/one-pot-spicy-sausage-and-tomato-pasta-23077666

Ingredients:

Photo credit: Ā© Debra M. Kirsch 2020
  • 12 oz smoked andouille sausage
  • 1/2 medium fennel bulb
  • 1 14.5 oz can diced fire roasted tomatoes
  • 12 oz dried linguine pasta
  • 1/2 tsp freshly ground black pepper
  • 1 cup fresh basil, plus more for garnish
  • 2 tsp kosher salt
  • 1/2 tsp black pepper

Directions:

  1. Cut andouille sausage crosswise into 1/2 inch rounds and thinly slice 1/2 medium fennel bulb. Place both in straight sided skillet with 2 tablespoons of olive oil. SautƩ lightly. Add 4 cups of water, dried pasta, 2 tsp kosher salt, and 1/2 tsp black pepper.
  2. Bring to a boil over high heat. Boil stirring, and turning pasta with tongs to prevent sticking, until the pasta is al sentence and the liquid is mostly evaporated. This is about 10 minutes. Meanwhile tear fresh basil leaves and add the last two minutes of cooking.
  3. Remove from heat and taste, seasoning with more salt as needed. Garnish with fresh basil.
Photo credit: Ā© Debra M. Kirsch 2020

Mushroom Flat Bread

Photo credit: Ā©ļøDebra M. Kirsch 2020

When I looked in fridge for lunch today, there wasnā€™t anything obvious, so I got to work and started some pizza dough. I figured by the time I decided on some topping ideas and pulled a salad together, the dough might be ready. I cut the rising time a little short, but I didnā€™t notice any impact from that, I still got a wonderful, thin crust, with the just the right amount of chewiness.

I went with my favorite pizza dough recipe from Bobby Flay, it hasnā€™t let me down yet! https://www.google.com/amp/s/www.foodnetwork.com/recipes/food-network-kitchen/basic-pizza-dough-recipe-1973255.amp There is some leftover to freeze too!

Ingredients:

1 tablespoon sugar

1 1/4-ounce packet (2 1/4 teaspoons) active dry yeast

3 tablespoons extra-virgin olive oil, plus more for brushing

3 3/4 cups all-purpose flour, plus more for dusting

1 1/2 teaspoons salt

Directions:

  1. Whisk 1 1/3 cups warm water (105 degrees F) and the sugar in a bowl; sprinkle the yeast on top. Set aside until foamy, about 10 minutes. Stir in the olive oil.
  2. Whisk the flour and salt in a large bowl. Make a well in the center of the flour and pour in the yeast mixture. Gradually stir with a wooden spoon to make a rough dough.
  3. Turn the dough out onto a lightly floured surface. Knead until smooth and elastic, about 5 minutes, dusting with more flour if necessary. Form into 2 balls. Brush 2 large bowls with olive oil, add a ball of dough to each and turn to coat with the oil. Cover tightly with plastic wrap and set aside at room temperature until doubled in size, about 1 hour, 30 minutes. Roll out and top as desired, or wrap in plastic wrap and freeze up to 1 month.

For the toppings I went with caramelized onions and sautƩed mushrooms, crumbled Boursin cheese, shredded parmesan and mozzarella, and topped with fresh chopped thyme and scallions.

Roll the dough out very thinly and sprinkle cheeses and onions & mushrooms all around. Bake pizza on middle rack at 450 F for 10-12 minutes, until Cheese is bubbly and crust starts to brown around the edges and on the bottom.

Photo credit: Ā©ļøDebra M. Kirsch 2020

Ham and Cheese Quiche

This is such a staple, along side a fresh green salad, it makes a wonderful lunch anytime of year. Enjoy it all with a favorite glass of white wine as a mid-day meal on the weekend, or with a creamy cappuccino for brunch!

Photo credit: Ā©ļøDebra M. Kirsch 2020

ā€¢ 1 (9-inch) frozen ready-to-bake pie crust (MUST be deep dish)

ā€¢ 1 tablespoon butter

ā€¢ 1/2 medium yellow onion, diced

ā€¢ 1 teaspoon minced garlic

ā€¢ 4 large eggs

ā€¢ 1 cup half-and-half

ā€¢ 1/2 teaspoon Italian seasoning or herbs de Provence

ā€¢ Fine sea salt and freshly cracked pepper

ā€¢ 1 and 1/2 cups diced/cubed cooked ham (leftover holiday ham or store-bought)

ā€¢ 1 cup swiss cheese, freshly grated (I used gruyere.)

ā€¢ 1 cup cheddar cheese, freshly grated

ā€¢ Optional garnish: chopped chives

1. Preheat oven to 375 degrees F. Place unwrapped frozen pie crust on a baking sheet and bake for 10 minutes. Remove and allow to cool slightly.

2. Add the butter to a nonstick pan and melt over medium-high heat. Add in the diced onion and cook 3-5 minutes or until soft and translucent. Add in the garlic and stir until fragrant, about 30 seconds. Remove, set aside, and allow to cool slightly.

3. In a large bowl, whisk the eggs until lightly beaten. Then whisk in the half-and-half, Italian seasoning, and salt and pepper to taste.

4. Gently stir in the cubed ham and both cheeses. Stir in the cooked onion and garlic. 

5. Pour filling into the pre-baked pie crust (still on the baking sheet) and bake on the lower oven rack for 35 to 42 minutes, or until set (it might be a little jiggly in the middle)

What you can do with Crystalized Ginger

Photo credit: Ā©ļøDebra M. Kirsch 2020

A grabbed a box of crystalized ginger at the store the other day, it just called out to me, and Iā€™ve been snacking on it ever since. I started looking around for ideas of ways to use it, besides to up the game on the gingersnaps I have plans to make. Well, there are lots of creative and yummy ideas to give a try.

  • Chop and add to batter for cookies, such as ginger snaps, or quick breads like gingerbread, orange bread or banana bread.
  • Melt butter with diced Crystallized Ginger, fresh lemon juice and sliced green onions in a saucepan. Spoon over hot rice and serve with chicken or fish.
  • Sprinkle finely chopped pieces as a finishing touch on apple pie a la mode or a whipped cream-topped brownie.
  • Combine diced Crystallized Ginger with nuts, brown sugar and spices for a baked apple or pear filling.
  • Add chunks to a stir-fry for a sweet and spicy bite.
  • Dip Crystallized Ginger pieces in melted chocolate. Let cool and serve as a special after dinner treat.
  • Add to water and sugar mixture to make ginger-infused simple syrup. Strain before adding to drinks, such as iced tea.
  • Sprinkle diced Crystallized Ginger into fruit salad for a spicy, zesty flavor lift.
  • Add to a homemade cranberry sauce with orange zest.

These ideas and more recipes can be found here https://www.google.com/amp/s/www.thegazette.com/2009/12/17/10-ways-to-use-crystallized-ginger%3ftemplate=amphtml

London Fog Sandwich Cookies

Photo credit: Ā©Debra M. Kirsch 2020

I donā€™t know where I found this recipe, itā€™s been saved in my ā€œNotesā€ on my phone for quite awhile. Itā€™s one of those ā€œcheaterā€ recipes that uses a cake mix as the base. But the Earl Grey Buttercream is totally homemade and balances it all out, flavors and effort!

The cookie and the frosting taken individually, I wasnā€™t impressed with, kind of worried actually, but together they work. Cooking and baking adventures arenā€™t always perfect, so I thought it was realistic to share this one, too. I think the buttercream came out lovely, I might try it with macaroons, it could be really good there.

London Fog Cookies

Cookies

2 boxes of devilā€™s food cake mix

4 large eggs

2 teaspoons of vanilla extract

2/3 cups of vegetable oil

Confectionā€™s Sugar for rolling

Directions:

Mix the cake mix, eggs, vanilla, and oil into a mixing bowl and mix very well. Cover with cling wrap and refrigerate for one hour. While the dough is chilling now would be a good time to start the butter for the Earl Grey buttercream as shown below! Preheat the oven to 375. Roll cookies into small balls about the circumference of a nickel. If you weigh them, they should be about 15 grams. Roll them into confectionerā€™s sugar. Bake on an ungreased cookie sheet for 8 minutes. Remove from the oven and tap the tops of the cookies to flatten slightly. Let cool on the pan for 5 minutes before moving to a wire rack to cool completely. Once cooled, pipe a dollop of Earl Grey buttercream on the bottom of one cookie and top with a second to make sandwiches.

Earl Grey Buttercream

2 egg whites

1/2 cup granulated sugar

1/8 teaspoon of cream of tartar

2 and 1/2 sticks of unsalted butter (separated!)

5 bags of Earl Grey tea

Directions:

Gently melt 2 sticks of butter in a saucepan and bring to a slight boil. Steep the tea bags into the butter and let them sit for 15 minutes in the melted butter. Squeeze the tea bags to extract any butter absorbed into the tea bags. You should notice some dark brown liquid coming out of the tea bags. This is the butter infused into the tea. Make sure to get as much of it out of the bags as possible. Discard the used tea bags. Stir the melted butter and pour into a bowl and put into the fridge for 30 minutes. This will firm up the butter but keep it soft/spreadable like room temp butter. When the cookies are cooling, put the egg whites, sugar, and tartar into the bowl of a stand mixer. Mix very well. Place over a double boiler. Gently cook the mixture until it comes to 160 degrees, whisking often. Immediately place the bowl onto the stand mixer with the whisk attachment. Beat well for about 8 minutes until heavy peaks form. This takes 5 to 8 minutes. Change the whisk attachment to the paddle attachment. At this point, the melted butter that was in the fridge should NOT be melted but spreadable like room temperature butter. Give it a good mix. If itā€™s still melted and not the consistency of spreadable butter, put it back into the fridge or freezer to firm up some more. The other half a stick of butter should be room temperature. Slowly add a tablespoon or two of the butter (doesnā€™t matter if itā€™s the infused butter or the regular butter) to the frosting beating well after each addition. After all the butter is added, beat the hell out of it until itā€™s the consistency of frosting. Should only take a few minutes.

Chef Lidia Bastianichā€™s inspired Chicken Caccitore

Photo credit: Debra M. Kirsch Ā©2020

We came across a wonderful cooking show the other night, and it inspired me to jump up and make this wonderful fall meal, Chicken Cacciatore. It was actually quite easy and though I didnā€™t have any mushrooms on hand, the dish was absolutely delicious!

Here is the direct link to the recipe, check it out and enjoy! https://www.mastercook.com/app/Recipe/WebRecipeDetails?recipeId=22287214